Tuesday, December 29, 2009

SuperDB Core Data App with Sections

If you've gotten through the first few chapters of More iPhone 3 Development, you might be wondering why we included a sectionNameKeyPath when we didn't actually divide up the table into sections. What's the point of having the fetched results controller use sections if they're not displayed?

The truth of the matter is that we originally planned to take the SuperDB application further than we were able to. Unfortunately, we reached a point where we had to cut it off and move on to other topics in order to both meet our deadline and to come in at a reasonable page count (as it was, we came in 250 pages over what we contracted for). Okay, we didn't actually meet our deadline, but we would have missed it by more.

Dave and I agreed to stop working on Core Data to get the book done and leave room for the other topics, but we left open the possibility of expanding the application further here in my blog. In order to be able to do that, we left in some vestiges of the original plan to make it easier to expand the application here.

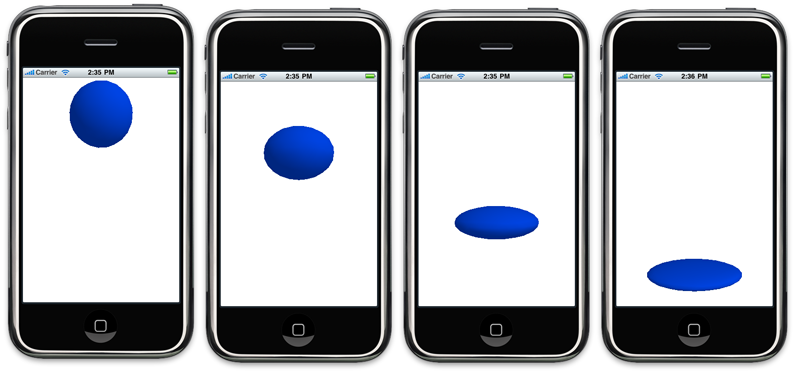
Here's the first expansion, which is to add alphabetical sections to the table, like so:

Screen shot 2009-12-29 at 5.14.44 PM.png


Let's continue on from the code in the 07 - SuperDB project. You can download the revised version from here. Make a new copy of it if you wish. The first thing we need to do is add a tableview delegate method that returns the title to be displayed in each section. To do that, add the following code to HeroListViewController.m, near the other table view methods:

- (NSString *)tableView:(UITableView *)tableView 
titleForHeaderInSection:(NSInteger)section {

if (!(section == 0 && [self.tableView numberOfSections] == 1)) {
id <NSFetchedResultsSectionInfo> sectionInfo =
[[self.fetchedResultsController sections] objectAtIndex:section];
return [sectionInfo name];
}

return nil;
}

This is a very generic method that will use the values from the fetched results controller. This method becomes basically a copy-and-paste bit of code that you can use unchanged in any controller that uses a fetched results controller with sections.

If you run your application now, however, you're going to get a separate section for each row (it would also crash, but we'll deal with that as well). In the version you've got now, we specified either name or secretIdentity as our sectionNameKeyPath, so every unique name or secret identity becomes its own section. Generally, not what want. So, the next step is to add virtual accessor method to our Hero object to return the value that we want to use to use to divide the list of heroes up. Let's do it alphabetically, so that means we need to create methods to return the first letter of the name and the secret identity. We can then use these new virtual accessor methods as our section name key paths, and the fetched results controller will divvy up the list by first letter.

In Hero.h, add the following two method declarations, just before the @end keyword:

- (NSString *)nameFirstLetter;
- (NSString *)secretIdentityFirstLetter;

Save Hero.h and switch over to Hero.m, and insert the implementation of these two methods, right above the @end keyword again:

- (NSString *)nameFirstLetter {
return [self.name substringToIndex:1];
}

- (NSString *)secretIdentityFirstLetter {
return [self.secretIdentity substringToIndex:1];
}

Save Hero.m. Next, we have to make a few changes in HeroListViewController.m. First, change the assignment of sectionKey to reflect our new virtual accessor methods. Look for the following code in the fetchedResultsController method and change the lines in bold to switch from using name and secretIdentity to using our new first-letter methods:

...
case kByName: {
NSSortDescriptor *sortDescriptor1 = [[NSSortDescriptor alloc] initWithKey:@"name" ascending:YES];
NSSortDescriptor *sortDescriptor2 = [[NSSortDescriptor alloc] initWithKey:@"secretIdentity" ascending:YES];
NSArray *sortDescriptors = [[NSArray alloc] initWithObjects:sortDescriptor1, sortDescriptor2, nil];
[fetchRequest setSortDescriptors:sortDescriptors];
[sortDescriptor1 release];
[sortDescriptor2 release];
[sortDescriptors release];
sectionKey = @"nameFirstLetter";
break;
}

case kBySecretIdentity:{
NSSortDescriptor *sortDescriptor1 = [[NSSortDescriptor alloc] initWithKey:@"secretIdentity" ascending:YES];
NSSortDescriptor *sortDescriptor2 = [[NSSortDescriptor alloc] initWithKey:@"name" ascending:YES];
NSArray *sortDescriptors = [[NSArray alloc] initWithObjects:sortDescriptor1, sortDescriptor2, nil];
[fetchRequest setSortDescriptors:sortDescriptors];
[sortDescriptor1 release];
[sortDescriptor2 release];
[sortDescriptors release];
sectionKey = @"secretIdentityFirstLetter";
break;
}

...


That's basically it. Well, no really. In testing this, I found that it crashed. For this new version, we need to tweak the fetched results controller delegate methods that we gave you in Chapter 2. Replace your existing implementations of controller:didChangeSection:atIndex:forChangeType: and controller:didChangeObject:atIndexPath:forChangeType:newIndexPath: with the following new versions:

- (void)controller:(NSFetchedResultsController *)controller didChangeObject:(id)anObject atIndexPath:(NSIndexPath *)indexPath forChangeType:(NSFetchedResultsChangeType)type newIndexPath:(NSIndexPath *)newIndexPath {
switch(type) {
case NSFetchedResultsChangeInsert:
[self.tableView insertRowsAtIndexPaths:[NSArray arrayWithObject:newIndexPath] withRowAnimation:UITableViewRowAnimationFade];
break;
case NSFetchedResultsChangeDelete:
[self.tableView deleteRowsAtIndexPaths:[NSArray arrayWithObject:indexPath] withRowAnimation:UITableViewRowAnimationFade];
break;
case NSFetchedResultsChangeUpdate: {
NSString *sectionKeyPath = [controller sectionNameKeyPath];
if (sectionKeyPath == nil)
break;
NSManagedObject *changedObject = [controller objectAtIndexPath:indexPath];
NSArray *keyParts = [sectionKeyPath componentsSeparatedByString:@"."];
id currentKeyValue = [changedObject valueForKeyPath:sectionKeyPath];
for (int i = 0; i < [keyParts count] - 1; i++) {
NSString *onePart = [keyParts objectAtIndex:i];
changedObject = [changedObject valueForKey:onePart];
}

sectionKeyPath = [keyParts lastObject];
NSDictionary *committedValues = [changedObject committedValuesForKeys:nil];

if ([[committedValues valueForKeyPath:sectionKeyPath] isEqual:currentKeyValue])
break;

NSUInteger tableSectionCount = [self.tableView numberOfSections];
NSUInteger frcSectionCount = [[controller sections] count];
if (tableSectionCount != frcSectionCount) {
// Need to insert a section
NSArray *sections = controller.sections;
NSInteger newSectionLocation = -1;
for (id oneSection in sections) {
NSString *sectionName = [oneSection name];
if ([currentKeyValue isEqual:sectionName]) {
newSectionLocation = [sections indexOfObject:oneSection];
break;
}

}

if (newSectionLocation == -1)
return; // uh oh

if (!((newSectionLocation == 0) && (tableSectionCount == 1) && ([self.tableView numberOfRowsInSection:0] == 0)))
[self.tableView insertSections:[NSIndexSet indexSetWithIndex:newSectionLocation] withRowAnimation:UITableViewRowAnimationFade];
NSUInteger indices[2] = {newSectionLocation, 0};
newIndexPath = [[[NSIndexPath alloc] initWithIndexes:indices length:2] autorelease];
}

}

case NSFetchedResultsChangeMove:
if (newIndexPath != nil) {

NSUInteger tableSectionCount = [self.tableView numberOfSections];
NSUInteger frcSectionCount = [[controller sections] count];
if (frcSectionCount >= tableSectionCount)
[self.tableView insertSections:[NSIndexSet indexSetWithIndex:[newIndexPath section]] withRowAnimation:UITableViewRowAnimationNone];
else
if (tableSectionCount > 1)
[self.tableView deleteSections:[NSIndexSet indexSetWithIndex:[indexPath section]] withRowAnimation:UITableViewRowAnimationNone];


[self.tableView deleteRowsAtIndexPaths:[NSArray arrayWithObject:indexPath] withRowAnimation:UITableViewRowAnimationFade];
[self.tableView insertRowsAtIndexPaths: [NSArray arrayWithObject:newIndexPath]
withRowAnimation: UITableViewRowAnimationRight
]
;

}

else {
[self.tableView reloadSections:[NSIndexSet indexSetWithIndex:[indexPath section]] withRowAnimation:UITableViewRowAnimationFade];
}

break;
default:
break;
}

}

- (void)controller:(NSFetchedResultsController *)controller didChangeSection:(id <NSFetchedResultsSectionInfo>)sectionInfo atIndex:(NSUInteger)sectionIndex forChangeType:(NSFetchedResultsChangeType)type {
switch(type) {

case NSFetchedResultsChangeInsert:
if (!((sectionIndex == 0) && ([self.tableView numberOfSections] == 1)))
[self.tableView insertSections:[NSIndexSet indexSetWithIndex:sectionIndex] withRowAnimation:UITableViewRowAnimationFade];
break;
case NSFetchedResultsChangeDelete:
if (!((sectionIndex == 0) && ([self.tableView numberOfSections] == 1) ))
[self.tableView deleteSections:[NSIndexSet indexSetWithIndex:sectionIndex] withRowAnimation:UITableViewRowAnimationFade];
break;
case NSFetchedResultsChangeMove:
break;
case NSFetchedResultsChangeUpdate:
break;
default:
break;
}

}

Since our original application gave every row its own section, we didn't have this problem, but what happens is when we receive notice that a row has moved, we need to make sure that the number of sections in the table and controller match. It's possible that a row moved to a new section, possibly even causing a row to be deleted or inserted in the controller, but not the table. If a row is moved from one section to another, and we don't account for it, the app will crash. If the moved row had been the last row in a section, we need to delete the section from the table, unless it was the last section, because tables have to have at least one section. If moving the row created a new section in the controller, we insert a new row into the table.

And that's really it, you now have your SuperDB's hero list divide up by first letter of either the hero's name or secret identity, depending on which tab was selected.

You should use the fetched results controller delegate methods from this posting instead of the ones in the book. The ones in the book work just fine for the application's in the book, but this one is more flexible and will handle a greater variety of situations correctly.

Monday, December 28, 2009

Camera App Update

At the request of a reader, I've updated the Chapter 16 application from Beginning iPhone 3 Development to use the new callback method. You can find the updated version here. The next time we updated the project archives on iPhoneDevBook.com, I'll include this version along with the original.

Sunday, December 27, 2009

Precompiler Defines

I had considered writing about this topic at one point, but discarded the idea as being too simple. I assumed it was already common knowledge.

In the last week, I've received two e-mails asking about this, so I decided it might be worth a quick post, even though many of you certainly know this already.

A lot of people like to put code in that is compiled into the debug version of their app, but not into the release version. Something along the lines of:

#ifdef DEBUG
NSLog(@"Some Debug Statement telling me the value of %@", foo);
#endif

I generally don't do much of this myself, preferring to use things like breakpoint actions for things that I don't want in my code. Personally, I want the code that gets compiled in Release and Debug builds to be as similar as possible to minimize unexpected surprises.

But, I recognize that this is a widely used approach that many people will want to use, and how you do it in Xcode isn't immediately obvious. If you open up the Project Info window by selecting Edit Project Settings from the Project menu, or double-clicking the project's root node in the Groups & Files pane, then click on the Build tab, you have the ability to set various options on a per-configuration basis. Under the heading GCC x.x - Preprocessing (where x.x is the version of GCC you are using), there is an option called Preprocessor Macros. You can define precompiler constants here on a per-configuration basis. Here's a screenshot that shows the value DEBUG being defined for the Debug configuration only:

Screen shot 2009-12-27 at 11.52.40 AM.png

The one problem with using this option is that defining a macro here triggers the precompiled headers to get re-compiled every time. Fortunately, the next option after Preprocessor Macros is called Preprocessor Macros Not used In Precompiled Headers, and it does exactly the same thing, only it doesn't define the macros until after the .pch file is read, meaning it won't trigger a recompile of the precompiled headers. That will result in shorter compile times. So, most of the time, this is what you want, unless you manually add something to the .pch file that relies on the macro:

Screen shot 2009-12-27 at 12.09.58 PM.png

Thursday, December 24, 2009

Happy Holidays to All…

It's less than a quarter of an hour until Christmas here on the East Coast of the United States. I've been in a mostly voluntary week away from the computer since we put More iPhone 3 Development to bed (though I did take time to pen another installment in the OpenGL ES from the Ground Up before going into exile).

Although part of the reason for becoming a hermit this week was simply to unwind after way too many very long days sitting at the computer, it was also necessary. Those long days took their toll on our house, so to get the house back in shape before holiday visitors came into town required some very long days cleaning and organizing the house.

My inbox is approaching critical mass, so if you've sent me something in the last week, I do apologize. I hope to respond to everyone starting sometime next week. If you don't hear back by the New Year, you might want to ping me again. It's almost certain I'll miss a mail or two.

I hope everybody is getting to enjoy some quality time with family and friends.

Friday, December 18, 2009

Holy Cow - 78 Million iPhone OS Devices‽

According to one analyst, at least, we are on the cusp of 78 million iPhone OS devices in existence.

It wasn't that long ago that I was startled by the fact that there were 55 million devices. Another 23 million devices in just a few months strikes me as a lot of sales, even for the iPhone.

Anyway, just thought I'd share. This may be my last post for a few days. I've come down with the flu, or at least some very nasty flu-like illness. I've been sleeping away the last couple of days (apologies to anyone who has e-mailed, tweeted, or phoned, I'm not even going to try and catch up until Monday). Combine that with the holidays and everything they entail, and I may not have much time for posting over the next week.

If I don't have a chance to say it, happy Christmas / Kwanzaa / Chanukah/ New Year / Bill of Rights Day / Forefather's Day / Maritime Day / Winter Solstice / Boxing Day and any other holiday I might have missed there..

Tuesday, December 15, 2009

OpenGL ES from the Ground Up Part 9a: Fundamentals of Animation and Keyframe Animation

This is not the article I was originally going to post as #9 in this series. That article will go up as #10. Before I get into OpenGL ES 2.0 and shaders, though, I want to talk about something more fundamental: animation.
Note:You can find the source code that accompanies this article here. A new version was uploaded at 10:14 Eastern time that fixed a problem with it not animating (see comments for details).
Now, you've already seen the most basic form of animation in OpenGL ES. By changing the rotate, translate, and scale transformations over time, we can animation objects. Our very first project — the spinning icosahedron - was an example of this form of animation, often called simple animation. Don't let the name fool you, though, you can do quite complex animations using nothing more changing matrix transformations over time.

But, how do you handle more complex animations? Say you want to make a figure walk, or a ball squish as it bounces?

It's actually not that hard. There are two main approaches to animation in OpenGL: keyframe animations and skeletal (or bone) based animations. In this installment, we'll be talking about keyframe animations, and in the next article (#9b), we'll look at skeletal animation.

Interpolation & Keys


Animation is nothing more than change in the position of vertices over time. That's it. When you translate, rotate, or scale an entire object, you are moving all of the vertices that make up one object proportionally. If you want to animate an object in more complex and subtle ways, you need a way to move each vertex different amounts over time.

The basic mechanism used in both types of animation is to store key positions for each vertex in an object. In keyframe animation, this is done by storing the individual position of every vertex for each key. For skeletal animation, it's done by storing the position of virtual bones, with some way to denote which bone affect the movement of which vertices.

So, what are keys? The easiest way to explain them is to go back to their origin, which is in traditional cel animation like the classic (pre-computer) Disney and Warner Brothers cartoons. In the earliest days of animation, small teams would do all the drawings that made up a short. But as the productions got larger, that became impossible, and they had to start specializing into different roles. More experienced animators took on the role of lead animator (sometimes called a key animator). These more experienced animators would not draw every cell in a scene, instead, they would draw the most important frames. These would usually be the extremes of motion, or poses that captured the essence of the scene. If they were animating a character throwing a ball, they might draw, perhaps, the frame where the arm was the furthest back, then a frame where the arm is at the top of the arc, then a third frame where the character released the ball.

Then, the key animator would move on to a new scene and another animator called an in-betweener (sometimes called a rough in-betweener, since it would often be another completely different person's job to clean up the in-betweener's drawings) would then figure out how much time there was between these key frames, then do all the intermediate drawings. If the throw was a one-second throw, and they were animating at twelve frames per second, they would have to figure out how to add an additional nine frames between the existing keyframes drawn by the lead animator.

The concept in three dimensional keyframe animation is exactly the same. You will have vertex data for the key positions in a motion, and your rough in-betweener will be an algorithm called interpolation.

Interpolating is some of the simplest math that you'll do in three-dimensional graphics. For each of the cartesian dimensions (x,y,z), you simply take the difference between the two keyframe values, figure out how much of the total animation time has elapsed, and divide the difference by that fractional portion.

It might make more sense if we do a practical example. Let's just look at one vertex. In our first keyframe, let's pretend that it's at the origin (0, 0, 0). For the second keyframe, we'll assume it's at (5, 5, 5), and the duration between these two keyframes if five seconds (just to keep the math nice and simple).

If we're one second into the animation, we just figure out the difference between the two vertices for each axis. So, in our case, the total movement between the two keyframes if five units on each of the x, y, and z axes (five minus zero equals five). So, if we're one second into our five second animation, we're 1/5th of the way through, so we add 1/5th of five to the first keyframe's x, y, and z values, to come up with a position of (1, 1, 1). Now, the numbers won't usually work out that nicely, but the math is exactly the same. Figure out the difference, then figure out based on the time elapsed what percentage of the way through this action we are, multiply the difference on each axis by that fraction, and then add the result to the first key frame's value for that axis.

This is the simplest form of interpolation, called straight line interpolation and it's just fine for most purposes. There are more complex algorithms that weight the interpolation based on how far into the animation you are. Core Animation, for example, provides the option to "ease in", "ease out", or "ease in/out" when performing an animation. Perhaps we'll cover non-straight-line interpolation in a future article, but for today, we're just going to keep things simple and work with straight-line interpolation. You can do the vast majority of what you want with this technique just by altering the number of keyframes and duration between them

Keyframe Animation in OpenGLES


Let's look at a really simple example of animation in OpenGL ES. When traditional hand-drawn animators are trained, the first thing they do is animate a bouncing ball that squishes as it bounces. It only seems fitting for us to do the same thing, so here's what our app is going to look like:
bouncy.png

Let's start by creating a ball in Blender (or any 3D program you want to use, if you've got a way to export the vertex and normal data in a useable manner. In this example, I'm going to use my Blender export script, which generates header files with the vertex data.

I start by creating an icosphere at the origin. I rename the mesh to Ball1, then I save this file as Ball1.blend and export Ball1.blend using my export script. You can find my Blender file for this keyframe here.
Screen shot 2009-12-15 at 2.45.21 PM.png

Now, I do a save-as (F2) and save a copy of the file as Ball2.blend. In this copy, I rename the mesh Ball2 so that the export script uses different names for the data structures. Then I hit 'tab' to go into edit mode, press 'A' and move and scale the ball's vertices so that it's moved down and is squished. I save the squished ball and export Ball2.h. You can find my Blender file for the second keyframe here.

Screen shot 2009-12-15 at 3.52.42 PM.png


At this point, I have two .h files, each containing the vertex positions for one keyframe in my animation. Working from my OpenGL ES template, I first define a few values in GLViewControler.h to help me keep track of the animation:
#define kAnimationDuration  0.3
enum animationDirection {
kAnimationDirectionForward = YES,
kAnimationDirectionBackward = NO
}
;
typedef BOOL AnimationDirection;

Since I will be bouncing back and forth between the two keyframes, I need to keep track of whether it's traveling forward or backward. I also set a value to control how fast it moves between the two keyframes.

Then, in GLViewController.m, I interpolate between the two keyframes repeatedly, like so (don't worry, I'll explain):
- (void)drawView:(UIView *)theView
{
static NSTimeInterval lastKeyframeTime = 0.0;
if (lastKeyframeTime == 0.0)
lastKeyframeTime = [NSDate timeIntervalSinceReferenceDate];
static AnimationDirection direction = kAnimationDirectionForward;

glClearColor(1.0, 1.0, 1.0, 1.0);
glClear(GL_COLOR_BUFFER_BIT | GL_DEPTH_BUFFER_BIT);
glLoadIdentity();
glTranslatef(0.0f,2.2f,-6.0f);
glRotatef(-90.0, 1.0, 0.0, 0.0); // Blender uses Z-up, not Y-up like OpenGL ES

static VertexData3D ballVertexData[kBall1NumberOfVertices];

glColor4f(0.0, 0.3, 1.0, 1.0);
glEnable(GL_COLOR_MATERIAL);
NSTimeInterval timeSinceLastKeyFrame = [NSDate timeIntervalSinceReferenceDate] - lastKeyframeTime;
if (timeSinceLastKeyFrame > kAnimationDuration) {
direction = !direction;
timeSinceLastKeyFrame = timeSinceLastKeyFrame - kAnimationDuration;
lastKeyframeTime = [NSDate timeIntervalSinceReferenceDate];
}

NSTimeInterval percentDone = timeSinceLastKeyFrame / kAnimationDuration;

VertexData3D *source, *dest;
if (direction == kAnimationDirectionForward)
{
source = (VertexData3D *)Ball1VertexData;
dest = (VertexData3D *)Ball2VertexData;
}

else
{
source = (VertexData3D *)Ball2VertexData;
dest = (VertexData3D *)Ball1VertexData;
}


for (int i = 0; i < kBall1NumberOfVertices; i++)
{
GLfloat diffX = dest[i].vertex.x - source[i].vertex.x;
GLfloat diffY = dest[i].vertex.y - source[i].vertex.y;
GLfloat diffZ = dest[i].vertex.z - source[i].vertex.z;
GLfloat diffNormalX = dest[i].normal.x - source[i].normal.x;
GLfloat diffNormalY = dest[i].normal.y - source[i].normal.y;
GLfloat diffNormalZ = dest[i].normal.z - source[i].normal.z;

ballVertexData[i].vertex.x = source[i].vertex.x + (percentDone * diffX);
ballVertexData[i].vertex.y = source[i].vertex.y + (percentDone * diffY);
ballVertexData[i].vertex.z = source[i].vertex.z + (percentDone * diffZ);
ballVertexData[i].normal.x = source[i].normal.x + (percentDone * diffNormalX);
ballVertexData[i].normal.y = source[i].normal.y + (percentDone * diffNormalY);
ballVertexData[i].normal.z = source[i].normal.z + (percentDone * diffNormalZ);

}


glEnableClientState(GL_VERTEX_ARRAY);
glEnableClientState(GL_NORMAL_ARRAY);
glVertexPointer(3, GL_FLOAT, sizeof(VertexData3D), &Ball2VertexData[0].vertex);
glNormalPointer(GL_FLOAT, sizeof(VertexData3D), &Ball2VertexData[0].normal);
glDrawArrays(GL_TRIANGLES, 0, kBall1NumberOfVertices);
glDisableClientState(GL_VERTEX_ARRAY);
glDisableClientState(GL_NORMAL_ARRAY);


}


First, I start out with some setup. I create a static variable to keep track of when we hit the last keyframe. This will be needed to determine how much time has elapsed. The first time through, we initialize it to the current time, then we declare a variable for keeping track of whether we're animating forward or backward.

    static NSTimeInterval lastKeyframeTime = 0.0;
if (lastKeyframeTime == 0.0)
lastKeyframeTime = [NSDate timeIntervalSinceReferenceDate];
static AnimationDirection direction = kAnimationDirectionForward;


After that, we do normal OpenGL ES stuff. The only thing of note here is that we rotate -90° on the X-axis. We're accounting for the fact that OpenGL ES uses a Y-up coordinate system and Blender uses a Z-up. We could also have rotated in Blender instead.

    glClearColor(1.0, 1.0, 1.0, 1.0);
glClear(GL_COLOR_BUFFER_BIT | GL_DEPTH_BUFFER_BIT);
glLoadIdentity();
glTranslatef(0.0f,2.2f,-6.0f);
glRotatef(-90.0, 1.0, 0.0, 0.0); // Blender uses Z-up, not Y-up like OpenGL ES

Next, I declare a static array to hold the interpolated data:
    static VertexData3D ballVertexData[kBall1NumberOfVertices];


Just to keep things simple, I set a color and enable color materials. I didn't want to clutter this example up with texture or materials.

    glColor4f(0.0, 0.3, 1.0, 1.0);
glEnable(GL_COLOR_MATERIAL);

Now I calculate how much time has elapsed since the last keyframe. If the time elapsed is greater than the animation duration, we flip the direction around so that we're going the other way.
    NSTimeInterval timeSinceLastKeyFrame = [NSDate timeIntervalSinceReferenceDate] - lastKeyframeTime;
if (timeSinceLastKeyFrame > kAnimationDuration) {
direction = !direction;
timeSinceLastKeyFrame = timeSinceLastKeyFrame - kAnimationDuration;
lastKeyframeTime = [NSDate timeIntervalSinceReferenceDate];
}

NSTimeInterval percentDone = timeSinceLastKeyFrame / kAnimationDuration;


In order to accommodate bi-directional animation, I declare two pointers to the source keyframe data and destination keyframe data, and point each one to the appropriate data array based on the direction we're currently going.

    VertexData3D *source, *dest;
if (direction == kAnimationDirectionForward)
{
source = (VertexData3D *)Ball1VertexData;
dest = (VertexData3D *)Ball2VertexData;
}

else
{
source = (VertexData3D *)Ball2VertexData;
dest = (VertexData3D *)Ball1VertexData;
}


And, finally, the interpolation. Here's a fairly generic implementation of that linear interpolation we were talking about:
    for (int i = 0; i < kBall1NumberOfVertices; i++) 
{
GLfloat diffX = dest[i].vertex.x - source[i].vertex.x;
GLfloat diffY = dest[i].vertex.y - source[i].vertex.y;
GLfloat diffZ = dest[i].vertex.z - source[i].vertex.z;
GLfloat diffNormalX = dest[i].normal.x - source[i].normal.x;
GLfloat diffNormalY = dest[i].normal.y - source[i].normal.y;
GLfloat diffNormalZ = dest[i].normal.z - source[i].normal.z;

ballVertexData[i].vertex.x = source[i].vertex.x + (percentDone * diffX);
ballVertexData[i].vertex.y = source[i].vertex.y + (percentDone * diffY);
ballVertexData[i].vertex.z = source[i].vertex.z + (percentDone * diffZ);
ballVertexData[i].normal.x = source[i].normal.x + (percentDone * diffNormalX);
ballVertexData[i].normal.y = source[i].normal.y + (percentDone * diffNormalY);
ballVertexData[i].normal.z = source[i].normal.z + (percentDone * diffNormalZ);

}

Then, all that's left to do is to do cleanup work.
    glEnableClientState(GL_VERTEX_ARRAY);
glEnableClientState(GL_NORMAL_ARRAY);
glVertexPointer(3, GL_FLOAT, sizeof(VertexData3D), &Ball2VertexData[0].vertex);
glNormalPointer(GL_FLOAT, sizeof(VertexData3D), &Ball2VertexData[0].normal);
glDrawArrays(GL_TRIANGLES, 0, kBall1NumberOfVertices);
glDisableClientState(GL_VERTEX_ARRAY);
glDisableClientState(GL_NORMAL_ARRAY);

}

Not that hard, right? It's just division, multiplication, and addition. Compared to some of the stuff we've been through so far, this is nothing. This is the basic technique used, for example, in the MD2 file format used by Id in their older games. Every animation used is performed using keyframe animation, just like I've done here. Later versions of Milkshape support other file formats, but you can do some pretty sophisticated animations using keyframes.

If you want to check out the bouncy ball, you can download my Xcode project and run it for yourself.

Not all 3D animation is done using keyframes, but interpolation is the basic mechanism that enables all complex animation. Stay tuned for the next installment, #9b, where we use interpolation to implement a far more complex form of animation called skeletal animation.

Monday, December 14, 2009

Availabilities

Sorry for the lack of posts the last few days. Once the book was finished, I decided to take a few days mostly away from the computer, which would have been glorious had I not come down with the flu. I'm now mostly recovered, and thought I should announce a few things.

I've had several people ask me when the book would be available, so here is the information I have currently.
  • The eBook should be available tomorrow-ish here
  • The dead-tree version should ship by the end of the year. Orders placed at online booksellers like Amazon should ship out by December 31. The book may not show up on bookstore shelves quite that soon, however, as it takes some time for them to get through the distribution channels.
I'm also announcing my own availability. With the book done, I now have the bandwidth to take on new contract work, for the first time in quite some time. If you're looking for an experienced person to do iPhone development, code or architecture review, or in-house training, drop me an e-mail at my first name, underscore, my last name at mac dot com.

Tuesday, December 8, 2009

Every Once in a While...

Since the original release of Beginning iPhone Development about a year ago (has it really only been a year??), there have been several little thing that have happened as a result of the book that have meant a lot to me. Things like seeing the picture of that nine year old kid with an app on the App Store holding up a copy of our book. Things like getting to meet Steve Wozniak. Things like getting tweets from readers thanking us for the book. All sorts of little things that just wouldn't have happened had it not been for the book.

I had another one the other day while I was traveling, and I didn't even really realize it had happened until I got home. On Sunday, I received a tweet that said
FYI: I decided to develop for the iPhone after reading your book, and mainly learned how from it. Thank you! Approved 1st try
Now, that's pretty neat no matter who the author is. Dave and I both love to hear about people who have started programming, or gotten back into programming using our book. It's a huge ego boost for us. It makes us feel good. For me, it makes me feel like I'm paying forward, in a small part, all the help that I've received over the years.

It wasn't until today that I realized that I knew who the author of that tweet is. Dan Bricklin created VisiCalc, the world's first spreadsheet computer program. It was the program that really put the Apple ][ on the map and proved to many people that a "personal" computer could do serious work.

Dan's also a book author, having published Bricklin on Technology this year, and the reviews of it are phenomenal.

If you're curious, check out Dan's first iPhone App: Note Taker.

For those of you who are too young to remember VisiCalc or to have used an Apple ][ outside of a computer museum, this may seems like a minor thing. But for me... well, if I kept a scrapbook, this tweet would go in it, and I would be picking out some really cool stickers to go around it. Glittery stars, dinosaurs. Maybe even dinosaurs with laser guns. And some spaceships. Definitely a couple of spaceships.

Monday, December 7, 2009

Final More iPhone 3 Dev Status Update

I woke up this morning to find all the final, laid out chapters of More iPhone 3 Development in my inbox. Dave and I need to read through each chapter and sign off on them. Once all chapters are signed off, the book is officially done and will be sent to printing.

Dave's already started his review. I won't get a chance to look at them until tonight on the train home from NYC, but we're not more than a few days away from being completely and officially done, which will feel really, really good.

Sunday, December 6, 2009

A Better Two-Finger Rotate Gesture

A while back, I posted a mostly functional, but imperfect sample code for doing a two-finger rotate gesture. I've been meaning to revisit this for some time to get it working correctly.

Tonight, I finally found some time to do so, so I present a better, fully-functional two-finger rotate gesture sample code project. This version allows you to rotate 360° or more without problems. Rather than relying on the order of the touches and the overall rotation angle, I just calculate the angle between the fingers' current location and their previous location.

Screen shot 2009-12-06 at 10.05.04 PM.png
The new version is actually quite a bit simpler than the previous one. Since each instance of UITouch contains both its current location and its previous location, we don't even need to keep track of anything. The old version, in addition to not working correctly past 180° was working much harder than it needed to. The only new thing in this version is that the function that calculates the angle between the two lines looks at the slope of both lines and returns negative or positive values based on which slope is larger.

OpenGL ES Projects and iPhone SDK 3.0

If you're having problems getting any of the older OpenGL ES sample code running under SDK 3.0 - specifically if you get a white screen rather than what you're supposed to see, here is the problem - delete the line of code specified below from the App Delegate's applicationDidFinishLaunching: method:

- (void)applicationDidFinishLaunching:(UIApplication*)application
{
CGRect rect = [[UIScreen mainScreen] bounds];

window = [[UIWindow alloc] initWithFrame:rect]; // <-- Delete this

GLViewController *theController = [[GLViewController alloc] init];
self.controller = theController;
[theController release];

GLView *glView = [[GLView alloc] initWithFrame:rect];
[window addSubview:glView];

glView.controller = controller;
glView.animationInterval = 1.0 / kRenderingFrequency;
[glView startAnimation];
[glView release];

[window makeKeyAndVisible];

}


The problem is that there's already window instance in MainWindow.xib, so creating a new one is problematic - there can only be on instance of UIWindow. Under 2.2.1 and before, it worked, under 3.0, it causes problems. In both cases, the line of code should be deleted, however.

Wednesday, December 2, 2009

Tech Talk World Tour NYC

Well, about 3:30 am this morning, I rolled in from the New York City stop on the iPhone Tech Talk World Tour. It was an exhausting, long, and very, very good day.

Yesterday's tech talk registration opened at 8:00am, with John Geleynse's kick-off presentation starting a little after 9:00. According to John, there were 350 iPhone developers in attendance, and looking around the room, I don't have trouble believing it. There were a lot of iPhone dev geeks sitting in the room. I got to see a lot of old friends, and meet a whole bunch of new people, which is one of the things I love about events like this.

There were three tracks, with five sessions during the day in each, plus a lab that was open all day long. Apple engineers were available for help and for code and UI review.

For me, the highlight of the day was Allan Schaffer's two OpenGL ES talks in the afternoon. They contained a lot of really in-depth technical data that I haven't seen presented before (and I went to all the OpenGL ES talks at WWDC). All of the other sessions I went to had some overlap with sessions I went to at the dub-dub, but they all contained good information and were presented well. I didn't hear a single negative comment from anyone about any of the sessions.

The format and presentation were very much like WWDC except on a much smaller scale, of course. Apple had with them the entire evangelism team, plus people from various engineering teams as well as support staff from Apple Events. We were given a continental breakfast, bagged lunch (but a really good bagged lunch), and we ended the day with a wine and cheese hour, which gave us the opportunity to socialize with each other and with all the Apple employees at the event.

It was a truly great event. I would have gladly paid to attend; the fact that Apple did this for us for free is somewhat mind-boggling to me. I can't imagine what it cost them to put it one. We had a whole floor of the Marriott Marquis, the event was fully catered, and Apple must have brought along somewhere in the range of thirty full-time employees, maybe even more. Plus, we got another Apple T-shirt for our collections, although mine is going into my wife's wardrobe, as it's been quite some time since I could wear size L T-shirt (probably Junior High).

Apple brought great people, presented great information, gave one-on-one consultations to dozens of developers, and they listened. They listened to developer's concerns about a wide variety of issues and gave feedback and insight to help people resolve their issues.

If they do these events again next year and you are an iPhone developer of any ability level, do yourself a favor and sign up as soon as it's announced. Even if you have to travel and spend the night in a hotel, it will be well worth the expense. It's a great opportunity to meet other developers, to talk to people at Apple, and to improve your knowledge of the platform.

So, for anybody at Apple who might stumble across this post: Thank you.

 
Design by Wordpress Theme | Bloggerized by Free Blogger Templates | coupon codes