


 9:42 AM
 Unknown

An alternative to creating materials in OpenGL ES to define the color of a polygon is to map a texture onto that polygon. This is a handy options that can give you good looking objects while saving a lot of processor cycles. Say you wanted to create a brick wall in a game. You could, of course, create a complex object with thousands of vertices to define the shape of the individual bricks and the recessed lines of mortar between the bricks.
Or you could create a single square out of two triangles (four vertices) and map a picture of a brick wall onto the square. Simple geometries with texture maps render much faster than complex geometries using materials.
Turning Things On
In order to use textures, we need to flip some switches in OpenGL to enable the features we need:
The first function call switches on the ability to use two-dimensional images. This call is absolutely essential; you can't map an image onto a polygon if you don't turn on the ability to use textures in the first place. It can be enabled and disabled as necessary, however there's typically no need to do that. You can draw without using textures even with this turned on, so you can generally just make this call once in a setup method and forget about it.
The next call turns on blending. Blending gives you the ability to combine images in interesting ways by specifying how the source and destination will be combined. This would allow you, for example, to map multiple textures to a polygon to create interesting textures. "Blending" in OpenGL, however, refers to any combining of images or of an image with a polygon's surface, so you need to turn blending on even if you don't need to blend multiple images together.
The last call specifies the blending function to use. A blending function defines how the source image and the destination image or surface are combined. Without getting too far ahead of ourselves, OpenGL is going to figure out (based on information we'll give it) how to map the individual pixels of the source texture to the portion of the destination polygon where it will be drawn.
Once OpenGL ES figures out how to map the pixels from the texture to the polygon, it will then use the specified blending function to determine the final value for each pixel to be drawn. The glBlendFunc() function is how we specify how it should do those blending calculations, and it takes two parameters. The first parameter defines how the source texture is used. The second defines how the destination color or texture already is used. In this simple example, we want the texture to draw completely opaque, ignoring the color or any existing texture that's already on the polygon, so we pass GL_ONE for the source, which says that the value of each color channel in the source image (the texture being mapped) will be multiplied by 1.0 or, in other words, will be used at full intensity. For the destination, we pass GL_SRC_COLOR, which tells it to use the color from the source image that has been mapped to this particular spot on the polygon. The result of this particular blending function call is an opaque texturing. This is probably the most common value you'll use. We'll perhaps look at the blending functions in more detail in a future installment in this series, but this is the combination you'll use most often and it's the only blending function we'll be using today.
NOTE: If you've used OpenGL and already know about blending functions, you should be aware that OpenGL ES does not support all of the blending function constants that OpenGL supports. The following are the only ones OpenGL ES allows: GL_ZERO, GL_ONE, GL_SRC_COLOR, GL_ONE_MINUS_SRC_COLOR, GL_DST_COLOR, GL_ONE_MINUS_DST_COLOR, GL_SRC_ALPHA, GL_ONE_MINUS_SRC_ALPHA, GL_DST_ALPHA, GL_ONE_MINUS_DST_ALPHA, and GL_SRC_ALPHA_SATURATE (which one can be used for source only).
Creating Textures
Once you've enabled textures and blending, it's time to create our textures. Typically, textures are created at the beginning of the program execution or at the beginning of a level load in a game, before you begin displaying the 3D view to the user. This is not a requirement, just usually a good idea because creating the textures takes a bit of processing power and can cause noticeable hiccups in program execution if done after you've begun to display complex geometries.
Every image in OpenGL ES is a texture, and textures cannot be displayed to the user exept when mapped onto an object. Well, there is one quasi-exception to that rule called point sprites which allow you to draw an image at a given point, but those have their own quirks, so that's a topic for a separate posting. In general, though, any image you display to the user has to be placed on triangles defined by vertices, sort of like applying stickers to them.
Generating a Texture Name
To create a texture, you tell OpenGL ES generate a texture name for you. This is a confusing term, because a texture's name is actually a number: a GLuint to be specific. Though the term "name" would indicate a string to any sane person, that's not what it refers to in the context of OpenGL ES textures. It's an integer value that represents a given texture. Each texture will be represented by a unique name, so passing a texture's name into OpenGL is how we identify which texture we want to use.Before we can generate the texture name, however, we need to declare an array of GLuints to hold the texture name or names. OpenGL ES doesn't allocate the space for texture names, so we have to declare an array like so:
GLuint texture;Even if you only are using one texture, it's still common practice to use a one-element array rather than declaring a single GLuint because the function used to generate texture names expects a pointer to an array. Of course, it's possible to declare a single GLuint and coerce the call, but it's just easier to declare an array.
In procedural programs, textures are often stored in a global array. in Objective-C programs, it's much more common to use an instance variable to hold the texture name. Here's how we ask OpenGL ES to generate one or more texture names for us:
You can create more than one texture when you call glGenTextures(); the first number you pass tells OpenGL ES how many texture names it should generate. The second parameter needs to be an array of GLuints large enough to hold the number of names specified. In our case, our array has a single element, and we're asking OpenGL ES to generate a single texture name. After this call, texture[0] will contain the name for our texture, so we'll use texture[0] in all of our texture-related calls to specify this particular texture.
Binding the Texture
After we generate the name for the texture, we have to bind the texture before we can provide the image data for that texture. Binding makes a particular texture active. Only one texture can be active at a time. The active or "bound" texture is the one that will be used when a polygon is drawn, but it's also the one that new texture data will be loaded into, so you must bind a texture before you provide it with image data. That means you will always bind every texture at least once to provide OpenGL ES with the data for that texture. During runtime, you will bind textures additional times (but won't provide the image data again) to indicate that you want to use that texture when drawing. Binding a texture is a simple call:The first parameter will always be GL_TEXTURE_2D because we are using two-dimensional images to create our texture. Regular OpenGL supports additional texture types, but the version of OpenGL ES that currently ships on the iPhone only supports standard two-dimensional textures and, frankly, even in regular OpenGL, two-dimensional textures are used far more than the other kinds.
The second parameter is the texture name for the texture we want to bind. After calling this, the texture for which we previously generated a name becomes the active texture.
Configuring the Image
After we bind the image for the first time, we need to set two parameters. There are several parameters we CAN set if we want to, but two that we MUST set in order for the texture to show up when working on the iPhone:
The reason why these two must be set, is that the default value is set up to use something called a mipmap. I'm not going to get into mipmaps today, but put simply, we're not using them. Mipmaps are combinations of an image at different sizes, which allows OpenGL to select the closest size version to avoid having to do as much interpolation and to let it manage memory better by using smaller textures when objects are further away from the viewer. The iPhone, thanks to its vector units and graphics chip, is actually pretty good at interpolating images, so we're not going to bother with mipmaps today. I may do a future posting on them, but for today, we're just going to tell OpenGL ES to scale the one image we're giving it to whatever size it needs using linear interpolation. We have to make two calls, because one, GL_TEXTURE_MIN_FILTER is used for situations where the texture has to be shrunk down to fit on the polygon, the other, GL_TEXTURE_MAG_FILTER is used when the texture has to be magnified or increase in size to fit on the polygon. For both cases, we pass GL_LINEAR to tell it to scale the image using a simple linear interpolation algorithm.
Loading the Image Data
Once we've bound a texture for the first time, it's time to feed OpenGL ES the image data for that texture. There are two basic approaches to loading image data on the iPhone. If you find code in other books for loading texture data using standard C I/O, those will likely work as well, however these two approaches should cover the bulk of situations you will experience.the UIImage Approach
If you want to use a JPEG, PNG, or any other image supported by UIImage, then you can simply instantiate a UIImage instance with the image data, then generate RGBA bitmap data for that image like so: NSString *path = ;
NSData *texData = ;
UIImage *image = ;
if (image == nil)
NSLog(@"Do real error checking here");
GLuint width = CGImageGetWidth(image.CGImage);
GLuint height = CGImageGetHeight(image.CGImage);
CGColorSpaceRef colorSpace = CGColorSpaceCreateDeviceRGB();
void *imageData = malloc( height * width * 4 );
CGContextRef context = CGBitmapContextCreate( imageData, width, height, 8, 4 * width, colorSpace, kCGImageAlphaPremultipliedLast | kCGBitmapByteOrder32Big );
;
;
The first several lines are fairly straightforward - we're just loading an image called texture.png out of our application's bundle, which is how we pull resources included in the Resources folder of our Xcode project. Then, we use some core graphics calls to get the bitmap data into RGBA format. This basic approach lets us use any kind of image data that UIImage supports and convert it to data in a format that OpenGL ES can accept.
Note: Just because UIImage doesn't support a filetype you want to use doesn't mean you can't use this approach. It is possible to add support to UIImage for additional image filetypes using Objective-C categories. You can see an example of doing that in this blog posting where I added support to UIImage for the Targa image filetype.
Once we have the bitmap data in the right format, we use the call glTexImage2D() to pass the image data into OpenGL ES. After we do that, notice that we free up a bunch of memory, including the image data and the actual UIImage instance. Once you've given OpenGL ES the image data, it will allocate memory to keep its own copy of that data, so you are free to release all of the image-related memory you've used, and you should do so unless you have another fairly immediate in your program for that data. Textures, even if they're made from compressed images, use a lot of your application's memory heap because they have to be expanded in memory to be used. Every pixel takes up four bytes, so forgetting to release your texture image data can really eat up your memory quickly.
The PVRTC Approach
The graphic chip used in the iPhone (the PowerVR MBX) has hardware support for a compression technology called PVRTC, and Apple recommends using PVRTC textures when developing iPhone applications. They've even provided a nice Tech Note that describes how to create PVRTC textures from standard image files using a command-line program that gets installed with the developer tools.You should be aware that you may experience some compression artifacts and a small loss of image quality when using PVRTC as compared to using standard JPEG or PNG images. Whether the tradeoff makes sense for your specific application is going to depend on a number of factors, but using PVRTC textures can save a considerable amount of memory.
Loading PVRTC data into the currently bound texture is actually even easier than loading regular image types, although you do need to manually specify the width and height of the image since there are no Objective-C classes that can decode PVRTC data and determine the width and height1.
Here's an example of loading a 512x512 PVRTC texture using the default texturetool settings:
NSString *path = ;
NSData *texData = ;
// This assumes that source PVRTC image is 4 bits per pixel and RGB not RGBA
// If you use the default settings in texturetool, e.g.:
//
// texturetool -e PVRTC -o texture.pvrtc texture.png
//
// then this code should work fine for you.
That's it. Load the data from the file and feed it into OpeNGL ES using glCompressedTexImage2D(). There is absolutely no difference in how you use the textures based on whether they were created with PVRTC compressed images or regular images.
Texture Limitations
Images used for textures must be sized so that their width and height are powers of 2, so both the width and height should be 2, 4, 8, 16, 32, 64, 128, 256, 512, or 1024. An image could be, for example, 64x128, or 512x512.When using PVRTC compressed images, there is an additional limitation: The source image must be square, so your images should be 2x2, 4x4 8x8, 16x16, 32x32, 64x64, 128x128, 256x256, etc. If you have a texture that is inherently not square, then just add black padding to make the image square and then map the texture so that only the part you want to use shows on the polygon. Let's look at how we map the texture to the polygon now.
Texture Coordinates
When you draw with texture mapping enabled, you have to give OpenGL ES another piece of data, which is the texture coordinates for each vertex in your vertex array. Texture coordinates define what part of the image is used on the polygon being mapped. Now, the way this works is a little odd. You have a texture that's either square or rectangular. Imagine your texture sitting with its lower left corner on the origin of a two-dimensional plane and with a height and width of one unit. Something like this:
Let's think of this as our "texture coordinate system", instead of using x and y to represent the two dimensions, we use s and t for our texture coordinate axes, but the theory is exactly the same.
In addition to the s and t axes, the same two axes on the polygon the texture is being mapped onto are sometimes referred to by the letters u and v. It is from this naming convention that the term UV Mapping often see in many 3D graphics programs is derived.

Okay, now that we understand the texture coordinate systems, let's talk about how we use those texture coordinates. When we specify our vertices in a vertex array, we need to provide the texture coordinates in another array surprisingly called a texture coordinate array. For each vertex, we're going to pass in two GLfloats (s, t) that specify where on that coordinate system illustrated above each vertex falls. Let's look at the simplest possible example, a square made out of a triangle strip with the full image mapped to it. To do that, we'll create a vertex array with four vertices in it:

Now, let's lay our diagrams on top of each other, and the values to use in our coordinate array should become obvious:

Let's turn that into an array of GLfloats, shall we?
static const GLfloat texCoords = ;In order to use a texture coordinate array we have to (as you might have guessed) enable the feature. we do that using our old friend glEnableClientState(), like so:
To pass in the texture coordinate array, we call glTexCoordPointer():
and then we have to... no, we're good. That's it. Let's put it all together into a single drawView: method. This assumes there's a single texture already bound and loaded.
- (void)drawView:(GLView*)view;
Here's what the texture I'm using looks like:

When I run the code above using this texture, here is the result:

Wait a second Kemosabe: That's not right! If you look carefully at the texture image and the screenshot above, you'll notice that they're not quite the same. The screenshot has the y-axis (or the t-axis, if you will) inverted. It's upside down, but not rotated, just flipped.
T-Axis Inversion Conundrum
We haven't really done anything wrong in an OpenGL sense, but the result is definitely wrong. The reason is that there's an iPhone-specific quirk at play. The iPhone's graphic coordinate system used in Core Graphics and everywhere that's not OpenGL ES uses a y-axis that increases as you go toward the bottom of the screen. In OpenGL ES, of course, the y-axis runs the opposite way, with increases in y going toward the top of the screen. The result, is that the image data we fed into OpenGL ES earlier, as far as OpenGL ES is concerned is flipped upside down. So, when we map the image using the standard OpenGL ST mapping coordinates, we get a flipped image.Fixing for Regular Images
When you're working with non-PVRTC images, you can flip the coordinates of the image before you feed it to OpenGL ES, by inserting the following two lines of code into the texture loading, right after creating the context: That will flip the coordinate system of the context before we draw into it, resulting in data in the format that OpenGL ES wants. Once we do that, all is right with the world:

Fixing for PVRTC Images
Since there are no UIKit classes that can load or manipulate PVRTC images, we can't easily flip the coordinate system of compressed textures. There are a couple of ways that we could deal with this.One would be to simply flip the image vertically in a program like Acorn or Photoshop before turning it into a compressed texture. Although this feels like a hack, in many situations it will be the best solution because it does all the processing work beforehand, so it requires no additional processing overhead at runtime and it allows you to have the same texture coordinate arrays for compressed and non-compressed images.
Alternatively, you could subtract your t-axis value from 1.0. Although subtraction is pretty fast, those fractions of a second can add up, so in most instances, avoid doing the conversion every time you draw. Either flip the image, or invert your texture coordinates at load time before you start displaying anything.
More Mapping
Notice in our last example that the entire image is shown on the square that's been drawn. That's because the texture coordinates we created told it to use the entire image. We could change the coordinate array to use only the middle portion of the source image. Let's use another diagram to see how we would use just the middle portion of the image:
So, that would give us a coordinate array that looked like this:
static const GLfloat texCoords = ;And if we run the same program with this new mapping in place, we get a square that displays only the center part of the image:

Similarly, if we wanted to show only the lower left quadrant of the texture on the polygon:

Which you can probably guess, translates to this:
static const GLfloat texCoords = ;And looks like this:

Wait, There's More
Actually, there's not really more, but the power of this may not be obvious from mapping a square to a square. The same process actually works with any triangle in your geometry, and you can even distort the texture by mapping it oddly. For example, we can define an equilateral triangle:
But actually map the bottom vertex to the lower-left corner of the texture:

Mapping this way doesn't change the geometry - it will still draw as an equilateral triangle, not a right triangle, but OpenGL ES will distort the texture so that the portion of the triangle shown in the bottom diagram is displayed on the equilateral triangle. Here's what it would look like in code:
- (void)drawView:(GLView*)view;
And when run, it looks like this:

Notice how the curlicues that were in the lower left of our square are now at the bottom of our triangle. Basically, any point on the texture can be mapped to any point on the polygon. Or, in other words, you can use any (s,t) for any vertex (u,v) and OpenGL ES will do what it needs to do to map it.
Tiling & Clamping
Our texture coordinate system goes from 0.0 to 1.0 on both axes. So, what happens if you specify something outside of those values? Well, there are two options, depending on how you setup your view.Tiling aka Repeating
One option, is to tile the texture. If you choose this option, called "repeating" in OpenGL parlance. If we take our first texture coordinate array and change all the 1.0s to 2.0s:
static const GLfloat texCoords = ;Then we'd get something like this:

If this is the behavior you want, you can turn it on by using glTexParameteri() in your setupView: method, like so:
Clamping
The other possible option is to have OpenGL ES simply clamp any value greater than 1.0 to 1.0 and any value less than 0.0 to 0.0. This essentially causes the edge pixels to repeat, which tends to give an odd appearance. Here is same exact picture using clamp instead of repeat.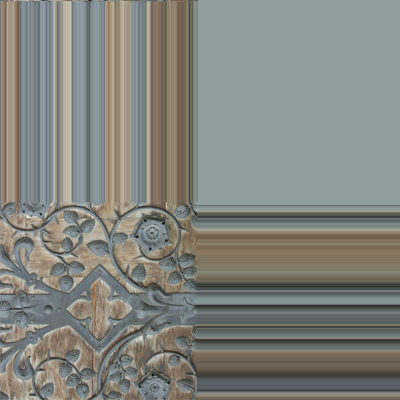
If you want this option, you would include the following two lines of code in your setup instead of the previous two:
Notice that you have to specify the behavior for the s and t axes separately, so it's possible to clamp in one direction and tile in the other.
This is the End
Well, that should give you a basic handle on the mechanism used to map textures to polygons in OpenGL ES. Even though it's simple, it's kind of hard to wrap your head around exactly how it works until you've played with a bit, so feel free to download the accompanying projects and play around with the values.Next time, I do believe we'll be entering the Matrix, so make sure you come on back.
Footnotes
- Actually, there is pre-release sample code that shows how to read the PVRT Header from the file to determine the width and height of the image, along with other details of the compressed image file. I didn't use it because a) since it's unreleased, I assumed it would be a violation of the NDA to use this code in a blog posting, and b) the code is not capable of reading all PVRTC files, including the one in the sample project for this article
Thanks to George Sealy and Daniel Pasco for helping with the t-axis inversion issue. Thanks also to "Colombo"from the Apple DevForums.
 Posted in:


0 nhận xét:
Post a Comment